Crypto Risk Management: Position Sizing, Stop-Losses, and the 1% Rule
Master risk management for crypto trading. Learn position sizing formulas, stop-loss strategies, and how CoinXSight's Portfolio module tracks your risk exposure.
MC
Marcus ChenSenior Quantitative Strategist·May 16, 2026 · 8 min read · Updated Oct 6
Why Risk Management Matters More Than Entry Signals
Every indicator, strategy, and Smart Money pattern in the CoinXSight Academy has one thing in common: none of them work 100% of the time. Even high-confluence setups (Confluence Score 8+/10) lose 28-35% of trades. Risk management is what keeps you in the game through those losses.
A simple truth: A trader with a 55% win rate and proper risk management (1:2 risk-reward) makes money over time. A trader with a 70% win rate but no stop-losses eventually blows up their account on a single trade. The first trader controls risk. The second trader is one black swan away from disaster.
💡 CoinXSight's Portfolio module tracks your positions, exposure, and concentration metrics in real-time. The platform monitors your Herfindahl concentration index — a measure of how heavily you are weighted in a single asset. Above 0.4 means you have dangerously high single-asset exposure.
The 1% Rule — The Foundation
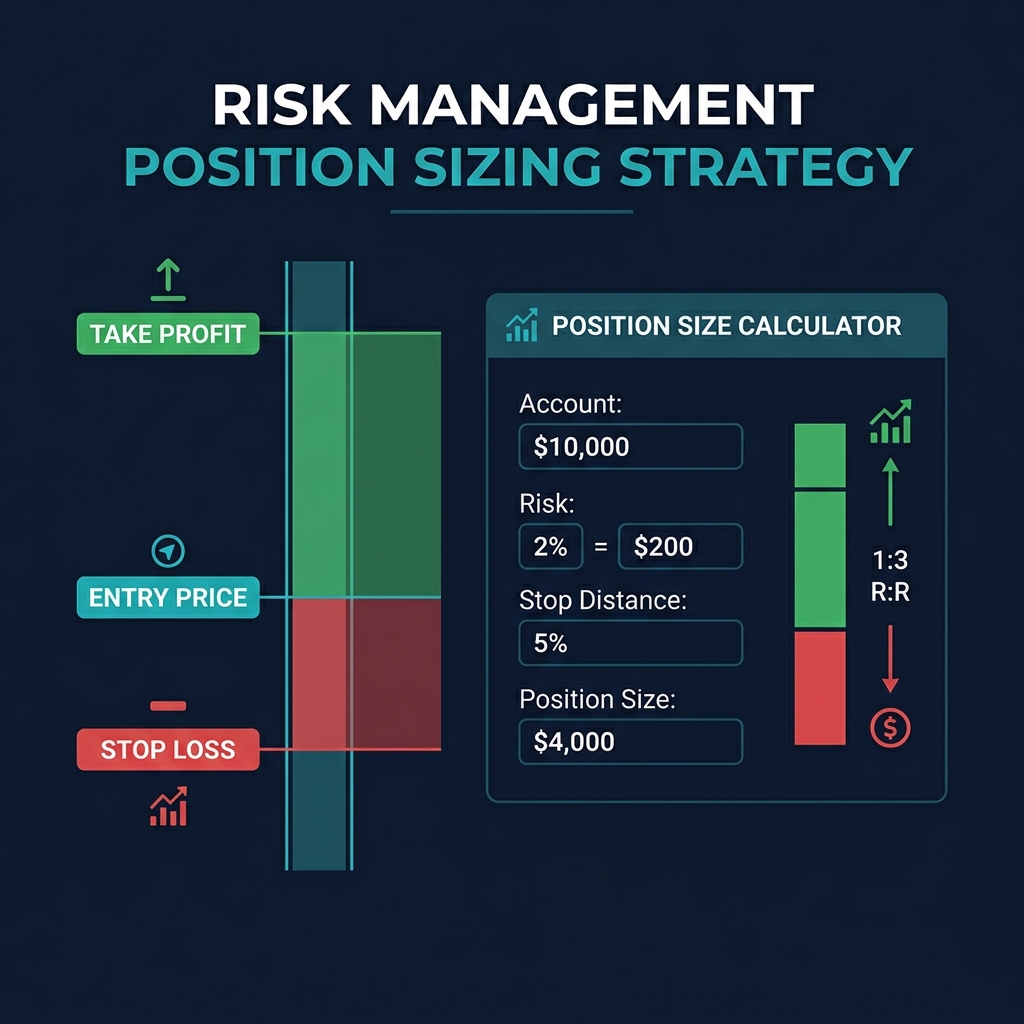
The 1% rule states: never risk more than 1% of your total trading capital on any single trade. For aggressive traders, 2% is the absolute maximum.
Why 1%: If you have a $10,000 account and risk 1% per trade, a losing streak of 10 consecutive losses costs you approximately $950 (compounding). That is painful but survivable. At 5% risk per trade, the same 10-loss streak destroys 40% of your account — a hole that requires a 67% gain just to recover.
Position Size = (Account × Risk %) / (Entry Price - Stop-Loss Price)

Example:
- Account: $10,000
- Risk per trade: 1% = $100
- Entry: BTC at $79,000
- Stop-loss: $77,000 (below the Order Block)
- Risk per unit: $79,000 - $77,000 = $2,000

Position Size = $100 / $2,000 = 0.05 BTC ($3,950 position)
This means you buy 0.05 BTC ($3,950 worth) — not your full $10,000. If BTC drops to $77,000, you lose exactly $100 (1% of your account). If it rallies, you profit proportionally.
Stop-Loss Strategies for Crypto
Strategy 1: Technical Stop-Loss (Recommended)
Place your stop-loss at a level where your trade thesis is invalidated:
Setup Type
Stop-Loss Placement
Rationale
Order Block entry
Below the OB zone
If price closes below the OB, institutional support failed
EMA bounce entry
Below the next EMA level
If price loses EMA 34, set stop below EMA 89
Support bounce
Below the support zone
If support breaks, the thesis is wrong
FVG fill entry
Below the FVG zone
If price moves through the entire FVG without reacting, the gap is invalidated
Breakout entry
Below the breakout candle low
If price falls back below the breakout, it was a fakeout
Strategy 2: ATR-Based Stop-Loss
The Average True Range (ATR) measures how much an asset typically moves per candle. Set your stop at 1.5-2x ATR below your entry to account for normal volatility.
ATR stops adapt to market conditions — they widen during high volatility and tighten during low volatility.
Strategy 3: Time-Based Stop
If your thesis does not play out within a defined number of candles, exit regardless of price. A 4H setup that has not moved in your favor within 5-8 candles (20-32 hours) is stalling — market conditions may have changed.
Risk-Reward Ratio — The Profit Multiplier
The risk-reward ratio (R:R) compares what you risk to what you expect to gain:
The golden rule: Never take a trade with R:R below 1:2 unless you have an extremely high-confidence setup (Confluence Score 9+/10). A 1:2 R:R means you can lose two out of three trades and still break even.
Portfolio-Level Risk Management
Individual trade risk is necessary but not sufficient. You also need portfolio-level controls:
Maximum Open Exposure
Never have more than 5-6% of your total capital at risk simultaneously. With 1% risk per trade, this means a maximum of 5-6 open positions at any time.
Correlation Risk
If you hold BTC, ETH, and SOL positions simultaneously, you are essentially triple-exposed to the same macro factor — crypto market direction. A single negative event (regulatory news, exchange hack) hits all three.
CoinXSight's Portfolio module shows your Herfindahl concentration index:
Daily loss limit: 3% of account → stop trading for the day
Weekly loss limit: 5-6% of account → stop trading for the week
Monthly drawdown limit: 10% → reassess your strategy entirely
Real-World Scenario: Risk Management Saves a Trade
Scenario — BTC, April 2026:
A trader identified a Bullish Order Block at $72,000-$72,500 on BTC with a Confluence Score of 7/10 on CoinXSight's Deep Alpha. They entered at $72,500 with:
Stop-loss: $71,500 (below the OB)
Target: $76,500 (next resistance)
Risk: $1,000 per BTC | Reward: $4,000 per BTC | R:R: 1:4
Position size: $500 risk ÷ $1,000 risk per unit = 0.5 BTC
What happened: BTC briefly dipped to $71,800 — a liquidity sweep below the OB. The stop at $71,500 was NOT hit. BTC then reversed and rallied to $77,200. The trader captured $4,700 per BTC in profit.
If the stop had been at $72,000 (inside the OB instead of below it), the liquidity sweep would have triggered it — and the trader would have missed the $4,700 move. Proper stop placement saved the trade.
⚠️ Limitation: No risk management system eliminates losses. It manages them. You will have losing trades, losing days, and losing weeks. The goal is to ensure that losing periods do not destroy your ability to trade through winning periods. Risk management is not exciting — it is the difference between survival and blow-up.
How to Manage Risk on CoinXSight — Multi-Module Workflow
I have seen traders with excellent entry systems blow up accounts because they "felt confident" and sized up. Risk management is not about how you feel — it is arithmetic. Here is the exact framework I follow.
Step 1: Size positions using Confluence Score on Deep Alpha
Open Deep Alpha → search BTC. The header shows Confluence: PARTIAL and ASI: 70 BUY. Here is how I translate that into position size:
STRONG Confluence (8-10/10): Full 1% risk per trade — maximum conviction.
PARTIAL Confluence: Cut to 0.5% risk. The platform is telling you some factors support the trade but not all. In the current screenshot, the trend is BEARISH but ASI shows a BUY — conflicting signals mean reduced size.
WEAK Confluence (below 5/10): Skip entirely or paper trade only.
The auto-generated trade parameters give me the math: Entry $80,021, SL $81,589, TP1 $76,886. Risk per unit = $80,021 – $81,589 = $1,568. With a $10,000 account at 0.5% risk (because PARTIAL confluence), max loss = $50. Position size = $50 / $1,568 = 0.032 BTC (~$2,560 position). That is my exact allocation — no guessing.
Never place stops at arbitrary percentages. Navigate to Chart Pro → identify the technical invalidation level. In the screenshot below, the EMA 200 sits at $80,832 and the Dragon Zone indicator marks resistance above. The SL from Deep Alpha ($81,589) places the stop just above the EMA 200 — technically sound because if price reclaims the EMA 200, the bearish thesis is invalidated. That is a stop based on structure, not emotion.
Once in a position, your job is monitoring whether the original thesis still holds. Navigate to On-Chain. I entered short because of bearish confluence + distribution. If Exchange Flows suddenly flip to large outflows (accumulation) while I am short, that is a risk event — the thesis is degrading. Current reading: +$32.8M inflow still supports the bearish position. But if this number crosses below -$10M for 2+ consecutive readings, I tighten my stop to breakeven regardless of where price is. The worst blow-ups happen when traders hold a position while every confirming signal has already reversed.
Frequently Asked Questions
How much should I risk per trade in crypto?
1% of your total trading capital is the standard for most traders. Aggressive traders can use 2%, but never more. At 1% risk, a 10-trade losing streak costs approximately 9.6% of your account — recoverable. At 5% risk, the same losing streak costs 40% — devastating.
Where should I place my stop-loss?
At the level where your trade thesis is invalidated — below an Order Block, below a key EMA, or below a support zone. Never use arbitrary percentages ("I'll set my stop 5% below entry") because the market does not care about your percentage. It reacts to technical levels.
What is a good risk-reward ratio for crypto?
Minimum 1:2 for any trade. This means your target should be at least twice as far from your entry as your stop-loss. With a 1:2 R:R, you only need to be right 34% of the time to break even. Professional traders aim for 1:3 or better.
Should I use leverage in crypto?
Leverage amplifies both gains and losses. If you use leverage, calculate your position size based on the leveraged exposure, not the margin. A $1,000 position at 10x leverage behaves like a $10,000 position — and a 10% adverse move wipes out your entire margin. Most beginners should avoid leverage entirely.
How does CoinXSight help with risk management?
CoinXSight's Portfolio module tracks your position sizes, P&L, and concentration index. Deep Alpha's Confluence Score helps you assess setup quality — higher scores justify larger positions, lower scores suggest smaller positions or skipping the trade entirely. Chart Pro provides the visual tools to identify precise stop-loss levels.
Master multi-timeframe analysis for crypto trading. Learn the 3-timeframe rule, top-down analysis flow, timeframe alignment signals, and how to combine…