AI Token Screening: How to Find High-Probability Trades Before the Crowd
Master AI-powered token screening using CoinXSight's Discovery module. Learn to filter 500+ tokens by trend, momentum, volume, and on-chain signals to find trades before they become obvious.
CB
Chloe BennettMarket Intelligence & Narrative Lead·May 18, 2026 · 11 min read · Updated Oct 6
The Discovery Problem: 500+ Tokens, Limited Attention
The crypto market contains thousands of tradeable tokens. Even after filtering for liquidity and exchange availability, you're left with 500+ viable candidates. No human can analyze 500 tokens daily — but AI can.
The discovery problem is the gap between the number of available opportunities and your ability to evaluate them. Most traders solve this by:
Trading only the tokens they already know (BTC, ETH, SOL) — missing emerging opportunities
Scrolling through Twitter/Discord for tips — following someone else's analysis, often late
Checking "top gainers" lists — buying after the move has already happened
CoinXSight's Discovery module solves this by applying AI screening across the entire token universe, surfacing only the highest-probability setups that meet specific quality thresholds.
This guide teaches you how to use Discovery systematically — not just as a random scan, but as the first step in a repeatable trading system.
How the Discovery Module Works
The 3-Layer Screening Architecture
Discovery doesn't just show you "trending tokens." It applies a multi-layer filtering system:
Layer 1: Signal Triage
The AI scans 500+ tokens across multiple timeframes and generates raw signals based on technical pattern detection. This is the broadest filter — it catches any token showing notable price action or pattern formation.
Layer 2: Quality Scoring
Each raw signal is scored using the ASI (AI Sentiment Index) system. Tokens with ASI scores below the quality threshold are filtered out. Only tokens with sufficient directional conviction survive this layer.
Layer 3: Contextual Ranking
Surviving signals are ranked by a combination of:
Trend strength (how strong is the directional move)
Volume confirmation (is the move supported by real participation)
Freshness (how recently was the signal generated)
Sector momentum (is the token's sector in favor)
The Discovery Dashboard
The Discovery dashboard provides three complementary views:
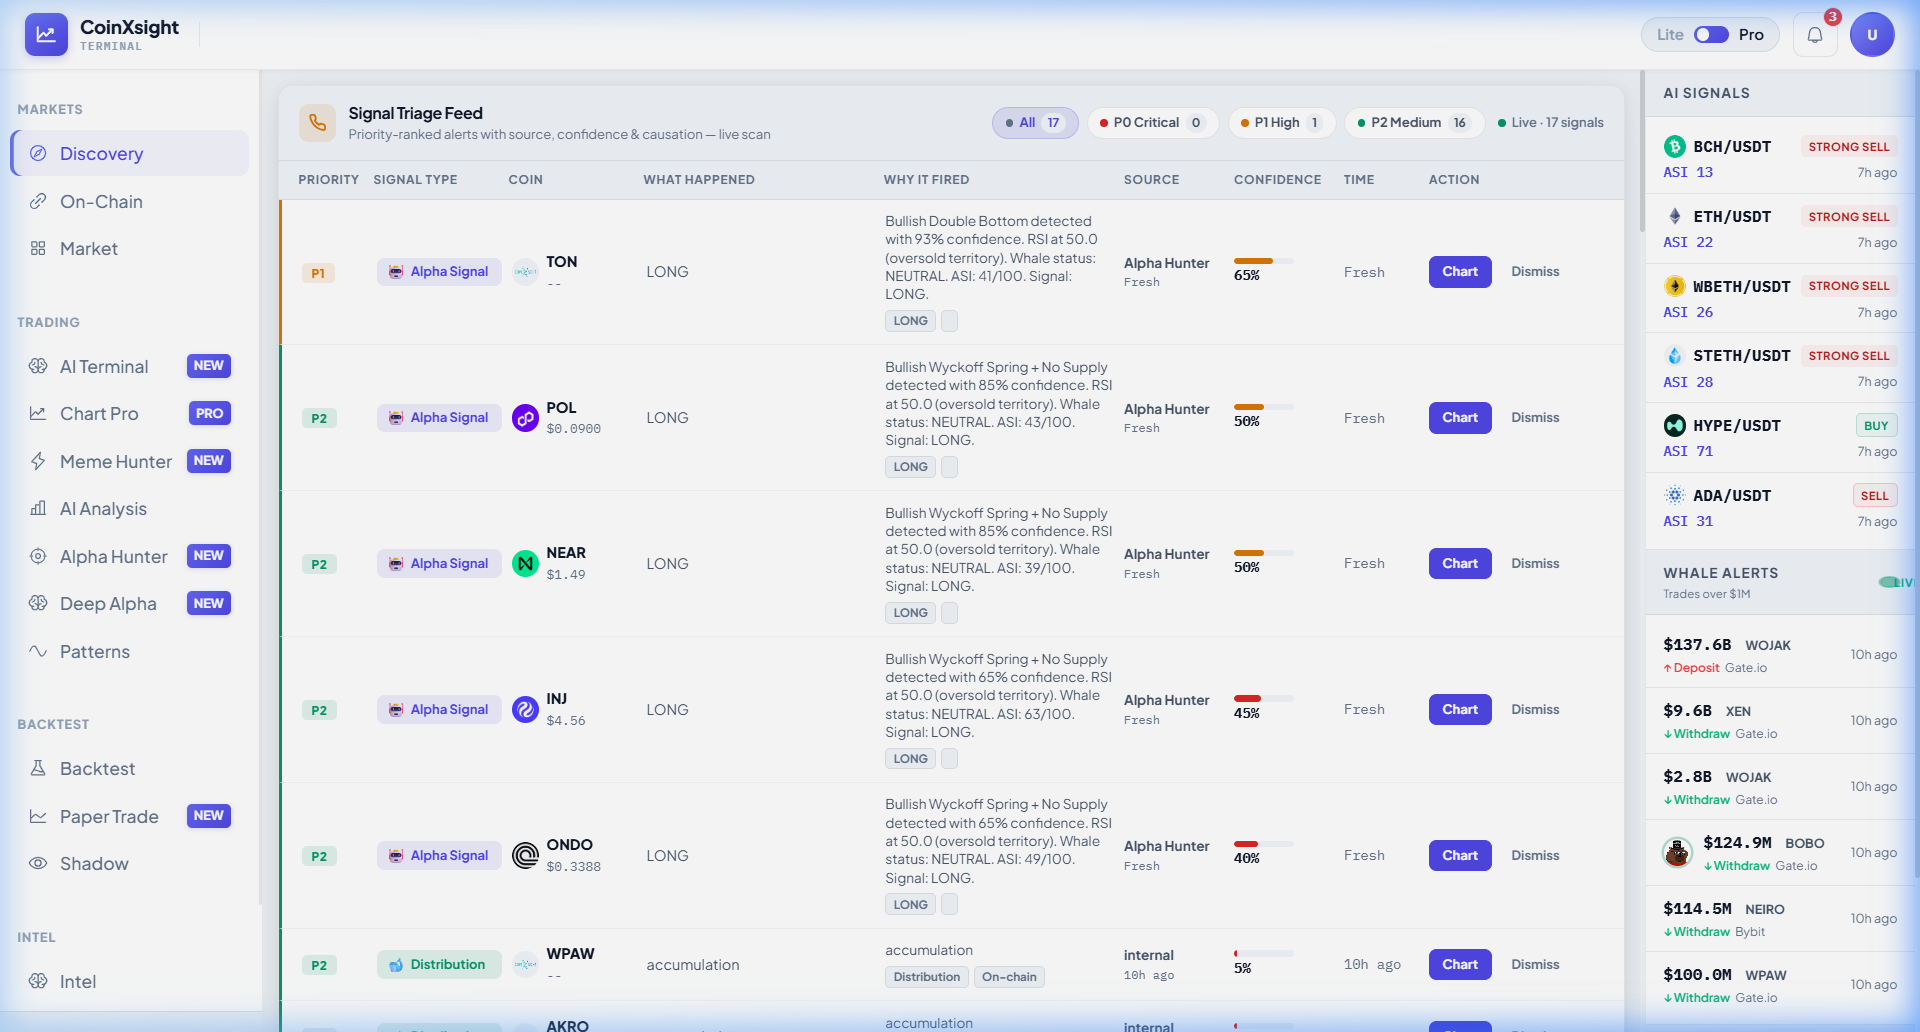
Signal Triage (Top Panel):
Shows the current signal distribution — how many tokens have active BUY vs SELL signals. The current reading shows 6 Buy / 3 Sell — a slight bullish skew across the market. This gives you instant macro sentiment before diving into individual tokens.
Live Feed (Center):
Real-time signal stream showing the most recent signals. Current signals include:
LINK — BUY, 4H — A 4-hour bullish signal on Chainlink
ENA — SELL, 4H — A 4-hour bearish signal on Ethena
AVAX — BUY, 1D — A daily bullish signal on Avalanche
Each signal includes the timeframe and direction, allowing you to quickly assess whether it matches your trading style (day trading = 1H, swing trading = 4H/1D).
Trending Engine (Bottom):
Multi-tab filtering system that groups tokens by different criteria — Hot (most active), New (recently generated signals), and Market (sector-based views).
Building a Daily Screening Routine
Modern crypto analytics platforms integrate these signals with additional data layers — combining trading indicators, on-chain metrics, and AI analysis for higher-probability entries.
Morning Scan (10 minutes)
Step 1: Read the Signal Triage (30 seconds)
Check the Buy/Sell ratio. This tells you the market's directional bias before you look at any individual token.
Ratio
Market Read
Your Approach
8+ Buy / 0-2 Sell
Strong bullish bias
Focus exclusively on long setups
5-7 Buy / 3-4 Sell
Moderate bullish bias
Prioritize longs, selective shorts
4-5 Buy / 4-5 Sell
Neutral / mixed
Be selective — only A+ setups
2-3 Buy / 6-7 Sell
Moderate bearish bias
Prioritize shorts, selective longs
0-2 Buy / 8+ Sell
Strong bearish bias
Focus on shorts or stay in cash
With the current 6 Buy / 3 Sell, the bias is moderately bullish — prioritize long setups.
Step 2: Scan the Live Feed (3 minutes)
Review the most recent signals. For each signal, note:
Token name and direction (BUY/SELL)
Timeframe (matches your trading style?)
Signal freshness (generated within the last 2 hours?)
Create a shortlist of 3-5 tokens that match your timeframe and direction preference.
Step 3: Volume Spike Filter (2 minutes)
Check the Volume Spikes section. Tokens with unusual volume activity are more likely to produce sustained moves. Cross-reference your shortlist — tokens that appear in BOTH the signal list AND the volume spike list are your highest-priority candidates.
Step 4: Deep Dive on Top 2-3 Candidates (5 minutes)
For each top candidate, click through to Deep Alpha for the full confluence analysis. Check:
Instead of scanning individual tokens, use Discovery to identify which sectors are trending, then trade the strongest token within the trending sector.
How to execute:
Open Discovery → Trending Engine → Market tab
Identify which sector has the most BUY signals (e.g., DeFi, AI, Layer 1)
Select the token with the highest ASI Score within the sector
Run Deep Alpha confluence analysis on that specific token
Why it works: Sector momentum tends to persist for 1-3 weeks. Once a sector starts trending, the strongest token within that sector typically outperforms the sector average.
Strategy 2: Divergence Discovery
Look for tokens where the Discovery signal DISAGREES with the broader market direction. These contrarian setups can produce outsized returns.
How to execute:
Check Signal Triage for overall market direction (e.g., 7 Buy / 2 Sell = bullish)
Find tokens with SELL signals during a bullish market (or BUY signals during a bearish market)
Investigate: Is the contrarian signal based on genuine weakness, or is it a temporary pullback within the broader trend?
If it's a pullback: this is a trend-following opportunity (buy the dip in a bull market)
If it's genuine structural weakness: avoid or short (the token is underperforming for a reason)
Risk: Contrarian trades require strong conviction. Only take them when Deep Alpha confirms with a Confluence Score ≥70 in your direction.
Strategy 3: Multi-Timeframe Confirmation
Use Discovery to find tokens that have signals on MULTIPLE timeframes simultaneously. Multi-timeframe alignment dramatically increases signal reliability.
How to execute:
Note tokens with 4H signals on the Discovery live feed
Check if the same token also has a 1D signal in the same direction
If yes: this is a high-conviction setup — the short-term and intermediate-term analysis agree
If they disagree (4H BUY but 1D SELL): skip — the timeframes are in conflict
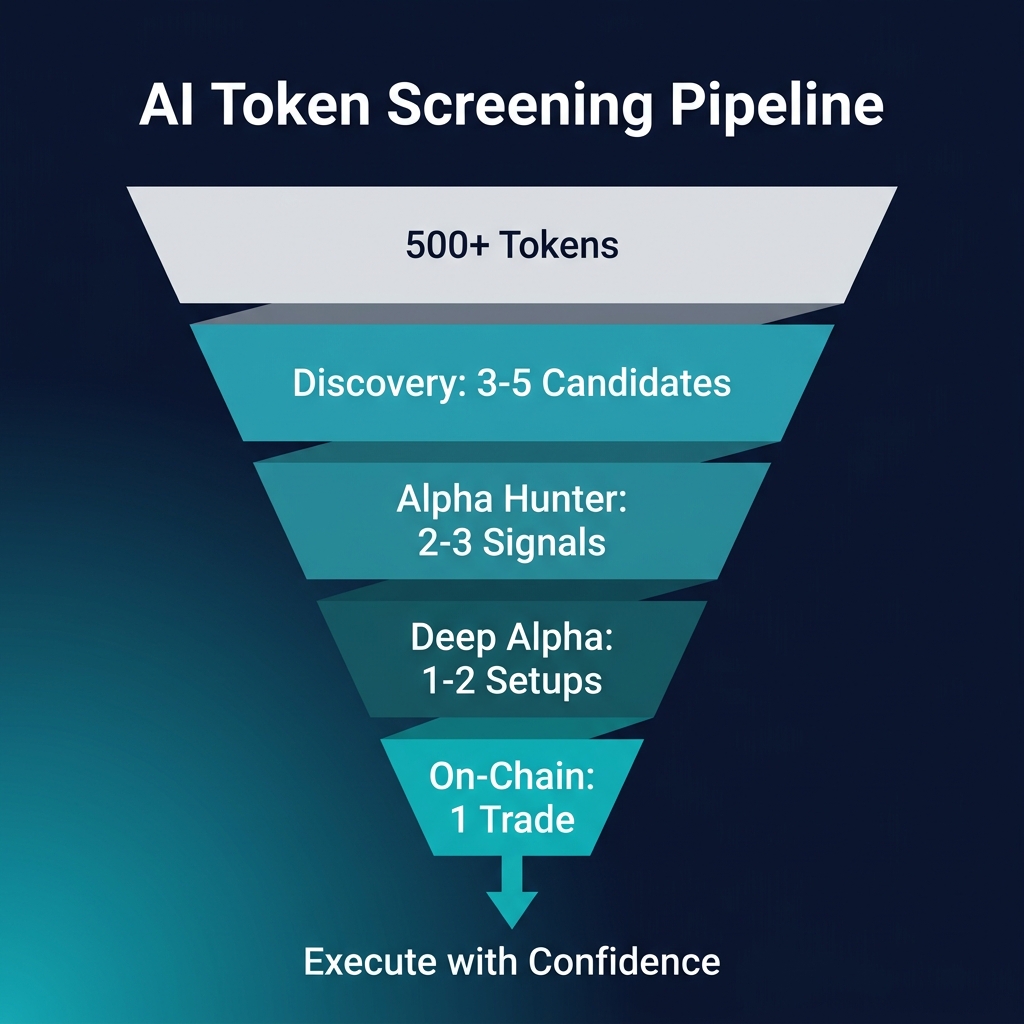
Chart Pro: Precise entry on the confirmed setup (execution gate)
The math: If Discovery surfaces 5 candidates and each subsequent filter removes 30-50%, you end up with 1-2 high-conviction trades per session. This is the correct output — quality over quantity.
Screening for Different Trading Styles
Day Trader Configuration
Parameter
Setting
Timeframe filter
1H only
Signal freshness
< 2 hours
Volume requirement
Must appear in Volume Spikes
Minimum ASI
55+
Max candidates
3-5 per session
Sessions per day
2-3 (morning, midday, evening)
Swing Trader Configuration
Parameter
Setting
Timeframe filter
4H and 1D
Signal freshness
< 12 hours
Volume requirement
Preferred but not required
Minimum ASI
65+
Max candidates
2-3 per day
Sessions per day
1 (morning review only)
Position Trader Configuration
Parameter
Setting
Timeframe filter
1D only
Signal freshness
< 24 hours
Volume requirement
Not required (daily signals are slower)
Minimum ASI
70+
Max candidates
1-2 per week
Sessions per week
2-3 (Monday, Wednesday, Friday)
Discovery vs. Alpha Hunter: When to Use Which
Both modules surface trading signals, but they serve different purposes:
Dimension
Discovery
Alpha Hunter
Primary function
Broad market scan
Deep pattern analysis
Token coverage
500+ tokens, shallow analysis
138 tokens, deep 4-stage analysis
Signal depth
Direction + timeframe
Direction + pattern type + ASI Score + confluence
Best for
Finding WHAT to analyze
Deciding WHETHER to trade
Speed
Fast scan (2 minutes)
Deep analysis (5+ minutes per token)
Use case
"What's interesting today?"
"Should I trade this specific token?"
The optimal workflow: Start with Discovery to find interesting candidates, then validate each candidate through Alpha Hunter's 4-stage pipeline before committing capital.
Common Screening Mistakes
1. Scanning Without a Plan
Opening Discovery and randomly clicking through signals is not screening — it's browsing. Before you open the module, define your parameters: What timeframe? What direction? How many candidates maximum?
2. Chasing Yesterday's Winners
The "Hot" tab shows tokens that are already moving. These are useful for monitoring market activity, but entering trades on tokens that have already moved significantly increases your risk of buying the top.
3. Ignoring Sector Context
A single BUY signal on a DeFi token doesn't mean much. Five BUY signals across the DeFi sector suggests a sector rotation is underway. Always assess individual signals within their sector context.
4. Overloading Your Watchlist
If you shortlist 15 tokens from a single screening session, you have too many. You can't meaningfully analyze 15 tokens through the full Deep Alpha pipeline. Limit your shortlist to 3-5 and analyze them thoroughly.
5. Skipping Validation
Discovery signals are starting points, not trade triggers. A signal that doesn't survive Deep Alpha validation (Confluence Score ≥60, all layers ≥15) should be discarded regardless of how good it looks on the Discovery screen.
Frequently Asked Questions
How many signals does Discovery generate per day?
Typically 10-20 active signals across all timeframes. Of these, 5-8 are usually fresh (generated within the last 4 hours). After filtering for your preferred timeframe and direction, you'll typically see 3-5 relevant candidates.
Can I set alerts for Discovery signals?
Currently, Discovery surfaces signals in real-time on the dashboard. For time-sensitive signal delivery, the Alpha Hunter module provides the deepest signal analysis with pattern detection and confluence scoring.
What if Discovery shows no signals?
No signals means the AI hasn't detected any high-quality setups. This happens during low-volatility periods or when the market is in a choppy, directionless regime. The correct response is to stay in cash — not to lower your quality thresholds.
How does Discovery differ from the Market module?
The Market module shows market data (prices, market caps, sector performance) — it's a data browser. Discovery shows AI-generated trading signals — it's an opportunity finder. Use Market for research and Discovery for trade ideas.
Should I use Discovery for meme coins?
Discovery focuses on established tokens with sufficient liquidity and data coverage. For meme coins, use the Meme Hunter module, which has specialized safety scoring and concentration analysis designed for the unique risks of meme tokens.
Summary
Token screening is the starting point of every successful trade. CoinXSight's Discovery module transforms the overwhelming task of monitoring 500+ tokens into a structured, AI-powered process that surfaces 3-5 high-quality candidates per session. By combining signal triage, volume spike detection, and trending engine filtering, Discovery reduces noise and amplifies signal — letting you focus your analytical energy on the opportunities most likely to produce results.
The screening workflow:
Read Signal Triage for macro bias (30 seconds)
Scan Live Feed for matching signals (3 minutes)
Cross-reference with Volume Spikes (2 minutes)
Deep-dive top 2-3 candidates through Alpha Hunter and Deep Alpha (5 minutes)